A little detail when configuring pure-ftpd with unix authentication. Be sure that all shells your users use are defined in /etc/shells file. If not, ftp server returns authentication failed, a very explicit description, lol.
Greetings
Oscar
Wednesday, August 31, 2011
Wednesday, May 11, 2011
mv old_name new_name
Hi guys:
I have changed my blog name to a more "artistic" name.
ThinkIT...SolveIT, because that is what we do, think a problem, a solution and then, solve it.
Greetings
Oscar
I have changed my blog name to a more "artistic" name.
ThinkIT...SolveIT, because that is what we do, think a problem, a solution and then, solve it.
Greetings
Oscar
Tuesday, May 10, 2011
vsftpd and mkhomedir module
After a lot of time without posting here I decided to share a solution that may save a lot of time and headaches when configuring an vsftpd+AD+pam environment. Normally, when we wanna authenticate our Linux boxes against Active Directory we set up winbind and pam with mkhomedir.so module. It allows us to create automatically users' home dirs when the user logins.
#echo "session required pam_mkhomedir.so skel=/etc/skel/ umask=0077" >> /etc/pam.d/system-auth
it works for sshd perfectly, BUT, not for vsftpd. For vsftpd set session_support=YES in vsftpd.conf, restart vsftpd and .... That's all...
As you see mkhomedir is a session type module and you must enable support in vsftpd.
Greetings
Oscar
Wednesday, September 8, 2010
Installing ejabberd under Centos 5.5, with AD auth and PostgreSQL backend
Ejabberd is a popular IM server in the open source community. It uses the XMPP protocol (the same as google). In this guide I will install it and configure it to enable AD authentication and to use a PostgreSQL database for the data.
Installing ejabberd
First of all download latest stable ejabberd version from
http://www.process-one.net/en/ejabberd/downloads. Currently version is 2.1.5
There are two choices for installing ejabberd. Like most of Linux packages you can install it using the binary file or compiling the source code. In this case we will use the binary since this way is easy an installs the necessary modules .
Give the binary execution permissions:
#chmod +x /root/ejabberd-2.1.5-linux-x86_64-installer.bin
Execute the binary:
./ejabberd-2.1.5-linux-x86_64-installer.bin
Complete the installation procedure answering all questions that the installer prompts.
Open ports in firewall for ejabberd:
-A RH-Firewall-1-INPUT -m state --state NEW -m tcp -p tcp --dport 5222 -j ACCEPT
-A RH-Firewall-1-INPUT -m state --state NEW -m tcp -p tcp --dport 5223 -j ACCEPT
-A RH-Firewall-1-INPUT -m state --state NEW -m tcp -p tcp --dport 5269 -j ACCEPT
-A RH-Firewall-1-INPUT -m state --state NEW -m tcp -p tcp --dport 5280 -j ACCEPT
Now, you must add the user account ejabberd to start ejabberd daemon.
#useradd -c "ejabber user" ejabberd
Ejabberd uses a particular database for its data. If you installed it being root you should give this directory and logs directory the appropriate permissions
#chown -R ejabberd /opt/ejabberd-2.1.5/database
# chown -R ejabberd /opt/ejabberd-2.1.5/logs
#chmod u+w /opt/ejabberd-2.1.5/database
#chmod u+w /opt/ejabberd-2.1.5/logs
Now, you are ready to start the server. Copy init script from /opt/ejabberd-2.1.5/bin/ejabberd.init to /etc/init.d and rename it as ejabberd.
#service ejabberd start
#ps aux | grep ejabberd
Now, you should add an account for admin purposes
#su - ejabberd /opt/ejabberd-2.1.5/bin/ejabberdctl register admin_user your_virtual_host your_pass
Your_virtual_host parameter is the virtual host that you grant access to admin. In your sever you may have several virtual hosts.
Grant access to the user in ejabberd ACLs as admin
#vi /etc/ejabberd/ejabberd.cfg
Add to the ACLs section:
{acl, admin, {user, "admin_user", "your_virtual_sever"}}. %%(the final dot is mandatory according Erlang syntax)
Login in to the web interface to see if all is ok for now:
your_server is the IP address or the domain name of the computer running ejabberd
Use the credentials you registered previously in the form
admin_user@your_virtual_host
Postgresql database
Now we will configure ejabberd to store data in Postgresql database, not for auth. First of all install postgresql server on your box.
#yum install postgresql-server.x86_64
Configure user postgres with passwd:
#su postgres
#psql
# ALTER USER postgres WITH PASSWORD 'your_pass';
Create the database ejabberd:
#sudo -u postgres createdb ejabberd
With the supplied script create the tables:
#su postgres
#psql ejabberd < /opt/ejabberd-2.1.5/lib/ejabberd-2.1.5/priv/odbc/pg.sql
Add an user "ejabberd" to interact with the database (if you want). In this case I did it through pgadmin visual client.
Configure the odbc connections parameters in ejabberd.cfg:
{odbc_server, {pgsql, "127.0.0.1", "ejabberd", "ejabberd", "your_pass"}}.
Now configure the modules that you desires to use with this odbc. In this case I selected:
mod_offline_odbc
mod_privacy_odbc
mod_private_odbc
mod_pubsub_odbc
mod_roster_odbc
In a first moment I selected vcard_odbc and odbc auth to test this config. This will change in a while.
In this moment you can test your server by adding accounts to it, through a client. For that, you should enable in-band registration. It allows users to register using a client.
%% In-band registration
{access, register, [{allow, all}]}.
Now, we will continue by adding Active Directory support for auth and vcard.
AD auth
Firsts of all, change the authentication mode to ldap in ejabberd.cfg
{auth_method, ldap}.
Downlaod ldapadmin from http://ldapadmin.sourceforge.net/ this tool helps you to identify the correct DN for the objects that you need to configure for LDAP auth.
Create a domain account, it will be used to query the Domain Controllers. Using ldap admin get the user's CN and the base CN for search.
{ldap_rootdn, "CN=My_user,CN=Users,DC=example,DC=org"}.
{ldap_password, "My_user_pass"}.
{ldap_base, "OU=Domain Users,DC=example,dc=org"}. %% From this base in LDAP, the search will take place
{ldap_uids, [{"userPrincipalName","%u@example.org"}]}. %% LDAP attribute which holds a list of attributes to use as alternatives for getting the JID
Now we will configure the vcard module to retrieve the info from AD servers.
{mod_vcard_ldap,
[{ldap_vcard_map, %% It maps the LDAP attributes in to friendly names
[{"NICKNAME", "%u", []},
{"GIVEN", "%s", ["givenName"]},
{"MIDDLE", "%s", ["initials"]},
{"FAMILY", "%s", ["sn"]},
{"FN", "%s", ["displayName"]},
{"EMAIL", "%s", ["mail"]},
{"ORGNAME", "%s", ["company"]},
{"ORGUNIT", "%s", ["department"]},
{"CTRY", "%s", ["c"]},
{"LOCALITY", "%s", ["l"]},
{"STREET", "%s", ["streetAddress"]},
{"REGION", "%s", ["st"]},
{"PCODE", "%s", ["postalCode"]},
{"TITLE", "%s", ["title"]},
{"URL", "%s", ["wWWHomePage"]},
{"DESC", "%s", ["description"]},
{"TEL", "%s", ["telephoneNumber"]}]},
{ldap_search_fields, %% It specifies the posible search fields when you want to search an user
[{"User", "%u"},
{"Name", "givenName"},
{"Family Name (Surname)", "sn"},
{"Email", "mail"},
{"Company", "company"},
{"Department", "department"},
{"Role", "title"},
{"Description", "description"},
{"Phone", "telephoneNumber"}]},
{ldap_search_reported, %% It specifies the reported fields as result of the search
[{"Full Name", "FN"},
{"Nickname", "NICKNAME"},
{"Email", "EMAIL"}]}
]
},
That's all. Now you must have a fully functional ejabberd IM server. Pretty soon I will post how to configure a cluster of servers.
Friday, August 27, 2010
Configuring VNC server on Linux hosts
Linux shell is a powerful and necessary tool for Linux administrator. You can do everything from command line, but, in some cases, there is useful a GUI for some tasks. In this post I will setup VNC server on two Linux boxes : Centos 5.5 and Ubuntu 10.04 desktop version. VNC allows admins to interact with a graphical interface in Linux hosts. This is similar to "Remote Desktop Connections" in Windows Servers.
Installing VNC on a Centos box
In some linux distributions VNC server is installed by default , if don't, use yum to install it
# yum install vnc vnc-server
Now you must specify a password for connecting to desktops.
# vncpasswd
Password:
Verify:
It creates a pass for user root. Remember security password considerations.
To start a session, only type
# vncserver :1
It will create a desktop session numbered as "one". This number is important. It defines the port used to establish connections with VNC server. The ports will be discussed later.
To connect to VNC server used a VNC client and specify connection parameters.

After IP address, type :<number of desktop>, the same you used previously, and click connect. Specify the password that you set and you will get this.

With this terminal you can configure system settings in graphical mode, e.g. system-config-users
Now if you want to access a full gnome terminal you should change the following:
Edit /root/.vnc/xstartup
[root@localhost ~]# vim /root/.vnc/xstartup
#!/bin/sh
# Uncomment the following two lines for normal desktop:
# unset SESSION_MANAGER
# exec /etc/X11/xinit/xinitrc
[ -x /etc/vnc/xstartup ] && exec /etc/vnc/xstartup
[ -r $HOME/.Xresources ] && xrdb $HOME/.Xresources
xsetroot -solid grey
vncconfig -iconic &
xterm -geometry 80x24+10+10 -ls -title "$VNCDESKTOP Desktop" &
twm &
--> Note the changes :
#!/bin/sh
# Uncomment the following two lines for normal desktop:
unset SESSION_MANAGER
exec /etc/X11/xinit/xinitrc
[ -x /etc/vnc/xstartup ] && exec /etc/vnc/xstartup
[ -r $HOME/.Xresources ] && xrdb $HOME/.Xresources
xsetroot -solid grey
vncconfig -iconic &
xterm -geometry 80x24+10+10 -ls -title "$VNCDESKTOP Desktop" &
startx &
The two commented lines were uncommented and the last line was changed to "startx" to start gnome sessions. This changes only affect new VNC sessions. You don’t have to restart any service.
Now we have a beautiful and fully gnome session:

If you want to stop VNC server you can do;
#service vncserver stop
or for a particular session
#vncserver -kill :<number of session>
Also if you want to use a web browser point it to
Installing VNC on an Ubuntu 10.04 box
Install vnc4server.
#apt-get install vnc4server vnc-java
Set a password:
#vnc4passwd
The config files are located in the same place /home/user/.vnc or /root/.vnc. Edit de xstartup file in the same way. After that, you should give the file /etc/X11/xinit/xinitrc execution permissions.
# chmod 755 /etc/X11/xinit/xinitrc
Use the client and that's all.

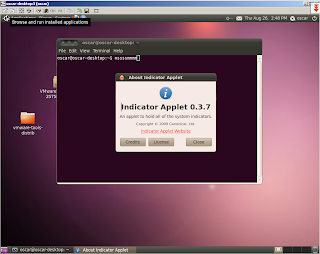
"The m and s syndrome"
If you did the above steps for Ubuntu 10.4 almost all work is finished . But, when you connect to VNC server and you type letter "m" or "s" the indicator applet shows you mail menu and session menu respectively. You may remove this icons from your desktop but I didn't like that. This behavior is a bug in indicator applet version 0.3.6 for Lucid. In the 0.3.7 the bug is fixed it.
You can download it from https://launchpad.net/ubuntu/+source/indicator-applet/0.3.7-0ubuntu1
To compile it, first install :
intltool
libgtk2.0-dev
libappindicator-dev
libpanel-applet2-dev
Compiling:
#./configure
#make
#make install
By default binaries are installed in /usr/local/libexec, but they must be placed in /usr/lib/indicator-applet/
Close all X sessions and do:
cp /usr/local/libexec/* /usr/lib/indicator-applet/
Now you can start your session without the "m and s syndrome" .
Required ports to establish VNC connections
VNC uses the following mechanism for assigning ports. The port used for a session is the sum of 5900+<number of the session that you select>. For example if you select session number 3 (vnc4server :3), the port used for it is 5900+3=5903. In the same way for web access but beginning in port 5800. In your firewall you should open a range of ports to allow VNC connections.
Using a SSH tunnel to encrypt data transmission
VNC is unsecure in nature. If you need to establish a connection over an unsecured network you may desire to protect it using SSH encryption mechanisms. We will use putty for that.
Configure putty tunnel in this way:

Then, point your vnc client to localhost:3000 (in this case)

And that's all!!!.
Friday, August 20, 2010
Veeam Reporter Free Edition is available for download
Hi: Good news for VMware admins. Veeam released Veeam Reporter Free Edition, a tool for document your virtual infrastructure. When your boss ask you to do a report you don't have to spend a lot of time making clicks on your virtual machines and host. I will test it. Wait my comments!!!
Thursday, August 12, 2010
Adding SATP rules on Vsphere 4.1 for EVA 5000 assuring failover
It's true that before implementing a software solution we must take a look in Hardware Compatibility Guides, but if we already have the hardware components and they aren't in HCL, the term engineering comes to play. :)
My company acquired Vsphere 4.1 and we had two EVAs: EVA 8000 and EVA 5000. With the first of them there were no problems. It's fully supported (Active/Active array with ALUA compliance) . The SAPT recognized it as VMW_SAPT_ALUA. But, always there is a but, EVA 5000 VCS 3.11 is not supported. It is recognized it as VMW_SAPT_DEFAULT_AA (Active/Active). As you see at the fig.1.

fig.1
The problem came when I did a virtual disk failover between controllers from Command View. All virtual machines inside that datastore hung up. The datastore was missing.
I began to look for a solution, but nothing. In some blogs the recommendation was to upgrade to VCS 4.x, which support Active/Active mode, but, another but, to do that, I should upgrade Command View from version 6 to 9 because version 6 doesn't support VCS 4.x. The problem is the license for the upgrade: license=$$. In others blogs the recommendation was to add rules for the desired SATP but they weren't specific to EVA 5000.
After a period of trial-error adding rules, the output of esxcli --server x.x.x.x corestorage device list gave me the information needed:
Vendor: COMPAQ
Model: HSV110 (C)COMPAQ
With this information, the addrule command is:
esxcli nmp satp addrule --vendor="COMPAQ" --model="HSV110 (C)COMPAQ" --claim-option="tpgs_off" --satp="VMW_SATP_DEFAULT_AP" --description="Support Mod for EVA5000"
tpgs_off means that the array is not ALUA compliant.
Reboot the host and as you see in fig.2 you will have the two host port of the non managing controller marked as "Stand By".

fig.2
Now, it is time to test the configuration. In Command View change the owner controller of the disk to the other. If all was successful, you must see the failover condition:

fig.3
Maybe, this configuration isn't supported, but, it works...
Subscribe to:
Comments (Atom)